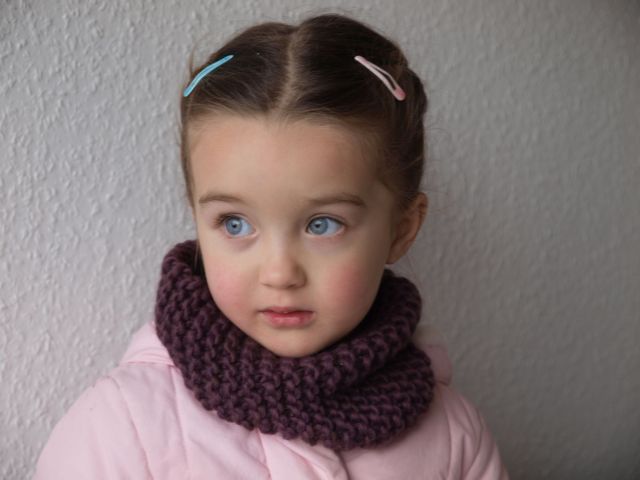
I’ve been really busy the past few weeks knitting up a storm for Christmas. We had snow last week but it all melted this past weekend and sadly it’s been cold and rainy around here lately. Whether it’s rain or snow though these holiday knits should keep you warm on a cold winters day and with the 70 % Wool, 30% Alpaca blend yarn they are really soft too! The scarf/cowl is the adult version of Anna’s Scarf which I made longer by knitting to 52cm, the hat is an adult version of the Baby Garter-Stitch Knit Hat that I made and the mittens I adapted partly from this Drops Design pattern. I’ve written up my patterns for the hat and mittens here. I was able to knit all these up last weekend while I was stuck at home with a pretty bad head cold, which I am hoping will be completely gone by the holidays and our trip back to the US to visit my family at the end of next week! These can easily be completed in the last few days we have before Christmas, using only 4 balls of chunky yarn which knits up very quickly, and you’ll still have time left over to make some Christmas cookies if you want too!

(Adult) Garter Stitch Hat
You will need:
2 Balls Lana Grossa: Linea Pura Fauna (or similar bulky weight Wool/Alpaca yarn blend)
Set of 5mm circular or double pointed needles
Set of 6mm circular and double pointed needles
Gauge: On 6mm needles in garter stitch, 8 stitches and 14 rows = 5cm x 5cm
Cast on 60 stitches evenly on a set of 5mm circular or double pointed needles, join and knit in the round as follows:
(The addition of a marking thread to tell where your round begins/ends is helpful!)
Rows 1-6: Knit 1, Purl 1 around
Now on size 6mm circular (or double pointed needles):
Row 7: Knit 6, make one stitch, around (total of 70 stitches)
Row 8: Purl around
Row 9: Knit around
Rows 10 and up: Repeat rows 8 and 9 until the hat measures at least 15cm. (16cm or more will make for a slightly longer hat. Mine came down just to the bottom of my ears.)
Ending on a purl row proceed to decrease as follows, switching to double pointed needles when needed:
Row 1: Knit 5, knit two together, around (total 60 stitches)
Row 2: Purl around
Row 3: Knit 4, knit 2 together, around (total 50 stitches)
Row 4: Purl around
Row 5: Knit 3, knit 2 together, around (total 40 stitches)
Row 6: Purl around
Row 7: Knit 2, knit 2 together, around (total 30 stitches)
Row 8: Purl around
Row 9: Knit 1, knit 2 together, around (total 20 stitches)
Row 10: Purl around
Row 11: Knit 2 together, around (total 10 stitches)
Row 12: Purl around
Row 13: Knit 2 together, around (total 5 stitches)
Cut the thread leaving a tail and thread the tail through the remaining stitches. Pull tight so there is no gap and weave the ends in. Sew a button of similar color on the top of the hat with the same yarn and a tapestry needle (optional).
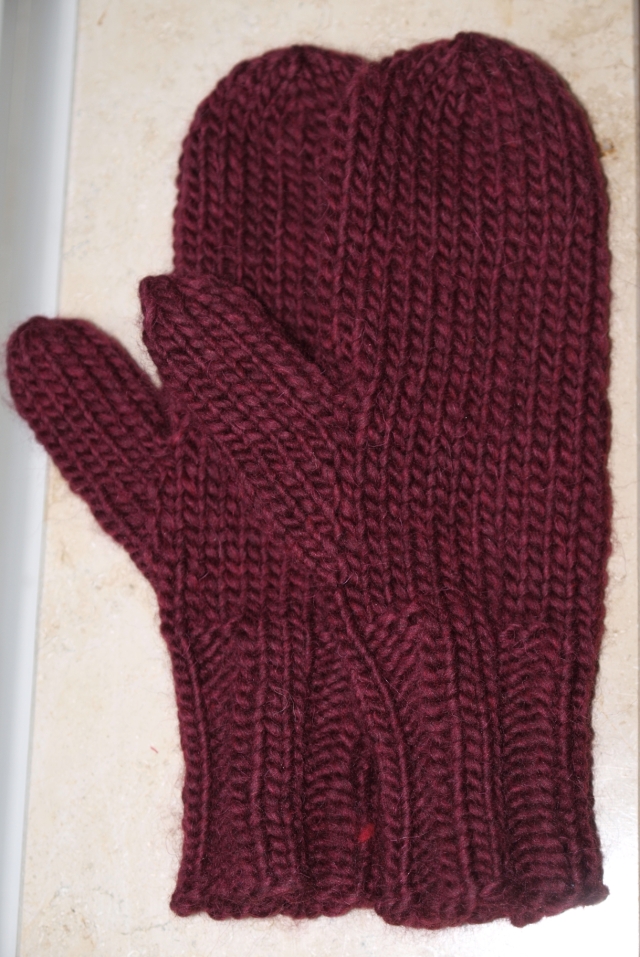
Mittens in Stockinette Stitch
Adapted from Drops Design
You will need:
2 Balls Lana Grossa: Linea Pura Fauna (or similar bulky weight Wool/Alpaca yarn blend)
Set of 5mm double pointed needles
Set of 6mm double pointed needles
Gauge: On 6mm needles in stockinette stitch, 7 stitches and 9 rows = 5cm x 5cm
For the rib:
Cast on 24 stitches with a set of 5mm double pointed needles and knit in the round as follows:
Knit 3, Purl 3, around until the rib measures 8cm
Change now to size 6mm double pointed needles for the rest.
For the body of the mitten:
Knit 5 rounds
Increase for the thumb (place a marking thread before and after each increased stitch):
Row 1: Make one stitch, Knit 1, Make one stitch, Knit around (3 thumb stitches and 26 stitches total)
Row 2: Knit around
Row 3: Make one, Knit 3, Make one, Knit around (5 thumb stitches and 28 stitches total)
Row 4: Knit around
Row 5: Make one, Knit 5, Make one, Knit around (7 thumb stitches and 30 stitches total)
Row 6: Knit around
Row 7: Make one, Knit 7, Make one, Knit around (9 thumb stitches and 32 stitches total)
Row 8: Knit around
Height should now be 14cm from the bottom of the mitten. If not knit until a length of at least 14cm is reached and then:
Put the 9 thumb stitches on a long thread and cast on 3 new stitches behind these thumb stitches.(Now a total of 26 stitches on the needles)
Make sure your stitches are evenly spaced on at least 3 needles. (I reduced from having stitches on 4 to 3 needles here but you can keep all 4 if you want.)
Knit in the round until piece measures 24cm or at least comes up over the top of your pinkie finger.
Decrease as follows:
Row 1: Knit two together, knit 11, knit 2 together, knit 11 (total of 24 stitches)
Row2: Knit two together, knit 4, repeat around (total of 20 stitches)
Row 3: Knit two together, knit 3, repeat around (total of 16 stitches)
Row 4: Knit two together, knit 2, repeat around (total of 12 stitches)
Row 5: Knit two together, around (total of 6 stitches)
Cut the yarn leaving a tail and pull through the remaining stitches. Pull tight and weave the end in on the inside of the mitten.
For the thumb:
Pick up 4 stitches with a new strand of yarn and a crochet hook evenly spaced behind the thumb and preferably over two legs of a former stitch so you won’t make a hole in the mitten here. (total of 13 stitches)
Place a marking thread at the beginning of the round and knit in the round on 6mm double pointed needles until the thumb measures 6cm from the shortest side.
Decrease:
Row 1: Knit 2 together around (total of 7 stitches)
Row 2: Knit 2 together around (total of 4 stitches)
Cut yarn and pull through remaining 4 stitches. Weave in the loose ends.